How do I create a Klickly account?
To create a Klickly account, head to brands.klickly.com/page/sign-up. Here, you will be prompted to create a user profile and to connect your eCommerce platform using one of three methods:
- Create an account manually
- Create an account using Shopify
- Create an account using Magento
You can also create a Klickly account via your ecommerce platform’s app store or marketplace – for more information, see here.
After your account has been created, you will be asked to finish setting up your account so that you can launch your first campaign.
Can I create a Klickly account via my eCommerce platform’s app store or marketplace?
Klickly is currently listed on the Shopify and Magento marketplaces! To create an account via these marketplaces, find Klickly in the relevant marketplace, click on the appropriate “Get” or “Install” button, and follow the on-screen instructions.
Your user profile and shopping cart connection will automatically be created when you install Klickly via these marketplaces. At this point, you will be asked to finish setting up your account so that you can launch your first campaign.
How do I create a Klickly account using Shopify?
If you currently use Shopify as your ecommerce provider, you can use our Shopify connection to set up your Klickly account.
First, make sure you're logged into your Shopify dashboard. Then begin your account creation on brands.klickly.com/page/sign-up.
Enter your Shopify address (the first part of the URL in your Shopify dashboard; it might not be your store name) and your Company name, agree to the Terms of Service and Privacy Policy, and click to sign up via Shopify.
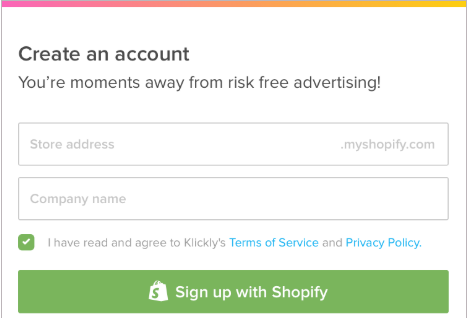
You will then be taken to Shopify (if you’re not already logged in, you may be asked to do so) and prompted to install the Klickly app.
Keep in mind, Klickly is an invite-only, “private” app; you must approve our integration
After your account has been created, you will be asked to finish setting up your account so that you can launch your first campaign.
If you prefer, you are also able to create your Klickly account manually or via Magento.
How do I manually create a Klickly account?
To get started, you must first log into your ecommerce platform (I.E. log into Shopify, Magento, etc).
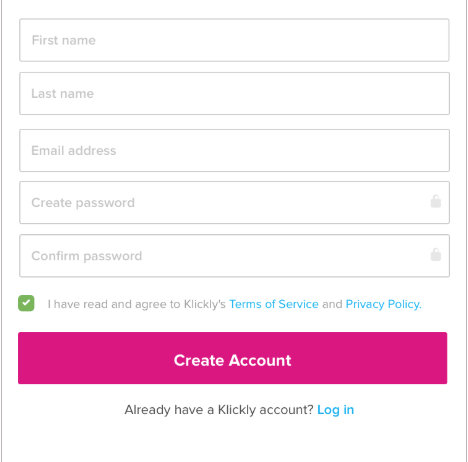
Once logged in, you can then begin to create your Klickly account manually on brands.klickly.com/page/sign-up.
To create your account, enter your first name, last name, email address, company name and password, confirm your password, agree to the Terms of Service and Privacy Policy, and click to create a new account. A user profile will be created based on the details you provide.
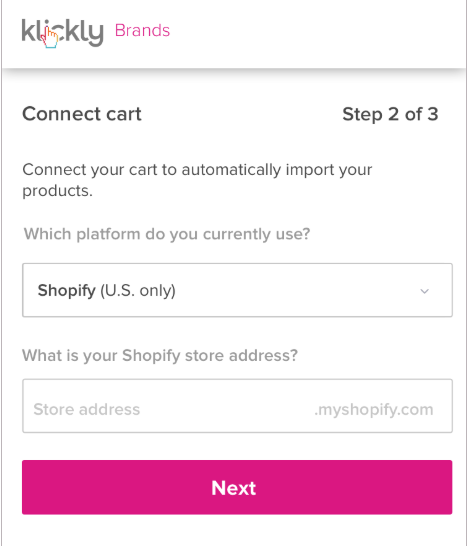
Now that you’re logged into your ecommerce platform (I.E. Shopify, Magento, etc) and you have signed up for Klickly, you will then be asked to connect the two. Simply choose your ecommerce provider and enter your store name.
After entering your details and clicking next, you will be automatically connected to your ecommerce provider to install Klickly. Keep in mind, Klickly is an invite-only, “private” app, so you may be prompted by Shopify to approve our integration.

After your account has been created, you will be asked to finish setting up your account so that you can launch your first campaign.
If you prefer, you are also able to create your Klickly account using both Shopify and Magento.
How do I integrate Recharge with Klickly?
If you’re using the Recharge subscription checkout in your Shopify store you will need to set-up our Klickly-specific pixel to allow our algorithm to best optimize. To set-up this pixel:
- Find your store address.
- Paste your Store Address into the Klickly script template, replacing the highlighted {STORE_ADDRESS}:
Klickly script template:
<script type="text/javascript">window.Klickly_Recharge = { "order_id": "{{ id }}" };</script><script type="text/javascript" async="" src="https://kst.klickly.com/index.bundle.js?shop={STORE_ADDRESS}.myshopify.com"></script>
Example completed Klickly script:
<script type="text/javascript"> window.Klickly_Recharge = { "order_id": "{{ id }}" }; </script> <script type="text/javascript" async="" src="https://kst.klickly.com/index.bundle.js?shop=mystore.myshopify.com"></script>
- Open your ReCharge Dashboard and navigate to Settings > Checkout.
- Find the Additional content & scripts text box for the Thank You page.

5. Paste your completed Klickly script into this box, being careful to paste this script at the beginning and on its own line.
6. Click Save

And you’re done! ReCharge should now be set up to work correctly with Klickly.
How do I integrate BoldCommerce with Klickly?
If you’re using the BoldCommerce subscription checkout in your Shopify store you will need to set-up our Klickly-specific pixel to allow our algorithm to best optimize. To set-up this pixel:
- Open the BoldCommerce dashboard (you can access this dashboard by opening your Shopify admin panel, clicking on ‘Apps’, and clicking on the BoldCommerce app)
- Click on ‘Integrations’ > ‘View All Integrations’ > ‘Advanced Tracking Scripts’

3. A modal will appear. In this modal, click on the ‘Enable Custom Tracking Scripts For Successful Purchases’ checkbox.

4. Scroll to the bottom of the modal where you will see a text field.
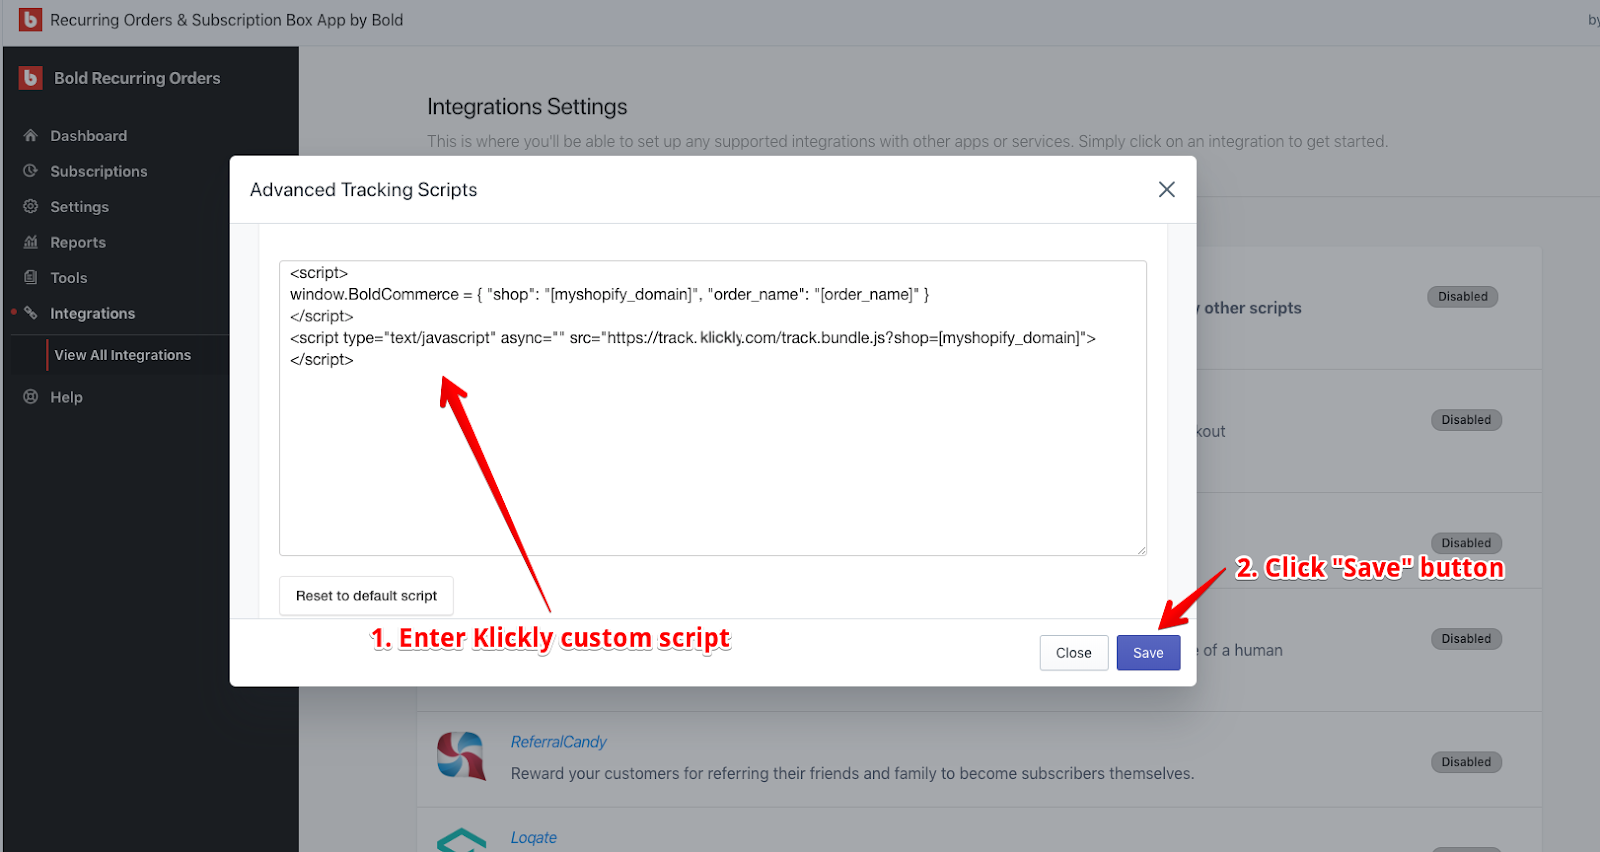
5. Copy the following Klickly script and paste it into the text field in the
BoldCommerce modal (if there is already code in this field, then paste it at the bottom on a new line; if there is sample code about GA, then just remove it and insert the Klickly code).
<script>
window.Klickly_BoldCommerce = { "shop": "[myshopify_domain]", "order_name": "[order_name]" }
</script>
<script type="text/javascript" async="" src="https://kst.klickly.com/index.bundle.js?shop=[myshopify_domain]"></script>
6. Click Save

And you’re done! BoldCommerce should now be set up to work correctly with Klickly.
How do I integrate Zipify OneClickUpsell with Klickly?
If you’re using the Zipify OneClickUpsell checkout in your Shopify store you will need to set-up our Klickly-specific pixel to allow our algorithm to best optimize. To set-up this pixel:
Open the Zipify OneClickUpsell dashboard (you can access this dashboard by opening your Shopify admin panel, clicking on ‘Apps’, and clicking on the Zipify app)
- Click on ‘Settings’ > ‘General’ > ‘Advanced Settings’
- Scroll down to the ‘Additional Scripts’ section.

3. Scroll down to the ‘Additional Scripts’ section.
4. Click the edit button in the ‘Thank You Page Scripts’ section

5. A modal will appear

6. Copy the following Klickly script and paste it into the text field in the Zipify modal
<script type="text/javascript">
window.Klickly_Zipify = { "order_id": "{{ order_id }}" };
</script>
<script type="text/javascript" async="" src="https://kst.klickly.com/index.bundle.js"></script>
7. Click ‘Save code’

And you’re done! Zipify should now be set up to work correctly with Klickly.
How do I integrate CartHook with Klickly?
If you’re using the CartHook checkout in your Shopify store you will need to set-up our Klickly-specific pixel to allow our algorithm to best optimize. To set-up this pixel:
- Find your store address.
- Paste your Store Address into the Klickly script template, replacing the highlighted {STORE_ADDRESS}:
Klickly script template:
$.getScript('https://kst.klickly.com/index.bundle.js?shop={STORE_ADDRESS}.myshopify.com');
Example completed Klickly script:
$.getScript('https://kst.klickly.com/index.bundle.js?shop=mystore.myshopify.com');
3. Open your CartHook Dashboard, click on your account email (in the top right-hand corner) and then click "Global Scripts".

4. Find the "Thank you page” text box (bottom of the page).
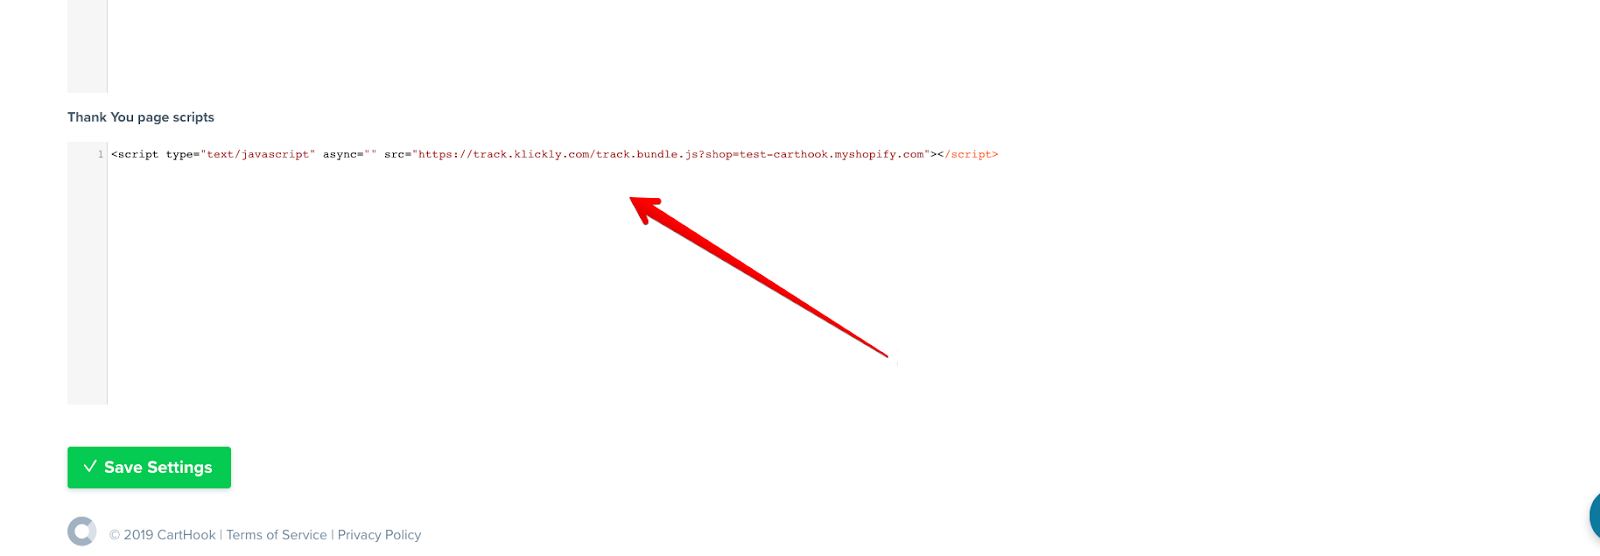
5. Paste your completed Klickly script into this box, being careful to paste this script at the beginning and on its own line.
6. Click Save

And you’re done! CartHook should now be set up to work correctly with Klickly.
Can I use Klickly if I have an international store?
Klickly currently only supports stores based in the continental United States, but we are working to open access to select international countries shortly. Stay tuned!
Why am I having issues setting up an account? It might be because ...
- Your Shopify store address is incorrect –– when signing up for Klickly using Shopify, you must enter your store address. This is the part of your shopify URL before the “.myshopify.com.” If you now use a different domain with domain masking, this new URL is not your store address (I.E. if you signed up for shopify with awesomestore.myshopify.com, and later bought coolstore.com, your address is still “awesomestore”) Your store address can be found by logging into your Shopify dashboard and noting the words or characters that precede “.myshopify.com”
- Your store address is misspelled –– see above
- You didn’t first log into your store before signing up with Klickly –– If you’re not logged into your ecommerce platform (Shopify, Magento, etc), you may need to log in before creating your Klickly account
- Your store is international –– sadly, Klickly only supports US stores at this time. We’re working to roll out in other regions soon
- Your store is not yet on a paid plan –– Klickly does not support free trial accounts on Shopify. You must have a paid plan to use the Klickly platform
- Your store is using an ecommerce platform we don’t yet support –– Klickly currently does not support automatic integrations for CommerceCloud, BigCommerce, Squarespace, Woo Commerce, and a few other platforms